Wednesday, August 25, 2010

Sewing Therapy

Since I have to go to the cancer doctor tomorrow, my principal encouraged me to stay home today to collect my thoughts. I'm glad I did because honestly, I wouldn't be very effective at school with all that is flooding my mind and my roller coaster emotional state! So.... since I haven't been able to sew in a long time, I got some projects done!! Yay! I made two sets of re-usable snack bags and sandwich wraps/placemats. They are for my friend who is going to be giving me much needed clothing for Big Ben! He is growing too quickly and needs more clothing! I love that I'm able to get some on a trade! :) She has two little girls who will be getting these; I hope they like them!

And here is the BIG one!! Okay, truth be told, it isn't very large, but Boy Howdee it took me a LONG time to make! Since it turned out so cute though, I'm okay with how long it took. I never make another one though.. ha! I followed this tutorial over at the A Lemon Squeezy Home blog.

First I had to cut out the pieces.

Then I had to cut out and sew on the pieces to make the owl flap. Isn't he cute!?

This lunch bag is cotton on both sides with Insul Brite between the layers (it is pretty cool....er warm stuff!).

It is coming along and starting to look like a bag! Yay!

Somehow, I'm supposed to turn the whole bag through this little opening....

It's like birthing a baby....
But woo hoo!! It worked!! After it was turnd I had to do a lot of top stitching and then she was done!
 I love it!!


I think I need to make some coordinating re-usable snack bags and a sandwich wrap/placemat!

Some stuff.

Well.. I moved in to a BRAND NEW school building. With the amount of "stuff", some would call it "crap", I have, it was like moving into a house! No kidding! I spent days and days up there unpacking and putting things away. I may or may not have a few boxes stuffed under my desk and covered with material to hide them... BUT, I got it done and yesterday was the first day with students! I still have some little things to get done and hung up, but my room is decorated, functional, colorful, and fun! I need to get some pictures of it and share them with you.
Life has been CRAZY to say the least. In the past week, I went from going on about my business without a care in the world, to now, one week later, having a diagnosis of Thyroid cancer. There was blood work, ultrasounds, biopsies at the hospital and then a diagnosis. I am stunned, to say the least. I've been through the gamut of emotions from disbelief, sorrow, anger, hope, and fear. If I'm going to have a cancer, this is the one to have, I've been told by many. So, that is a good thing! I meet with an Oncologist tomorrow to talk about what is next. There will be scans, surgery, and possibly some radioactivity post operatively. Bleh! But, I am trying to stay positive. I have been so amazed and touched by the outpouring of prayers and love that I have received from family, friends, and coworkers. I truly am a blessed woman! So, that's where I have been and what I've been dealing with- in a nutshell.

So.. until today I hadn't done any sewing, but I have made some things. Here is what I've accomplished.

Cookies. These were made by using a box of yellow cake mix and adding 2T of honey, 3 mashed bananas, and 3/4c of crasins. They were very soft and chewy and I really liked them. I say "were" because, yes, they are gone now. ;)


An "All About Me" poster for Brooke's class! This was super fun to do! The picture in the bottom right is of her, however you can NOT convince her of this fact. When you ask her who the people are in the pictures, she emphatically says "Baby Ben!!! Baby Ben!!!" when she comes to that picture! I'll give her credit, she does look like Ben in that pciture!


And finally, a super super large Iphone to use in my classroom to display different strategies students can use for assignments! The ones they will use most frequently or must use will be in the bottom row. This monster "phone" is 3 feet x 4 feet! They think it is uber cool, and I tend to agree!

 (Oh, and the strategies displayed are just a few of the 150 that we have!
My friend and co-worker, Debbie came up with them and the idea- she rocks!)

Sunday, August 15, 2010

*Sigh*, It's Back to Work Again!

Well, my summer has come to a close. I am SO sad to see it go, and boggled by how quickly it went! I will still be crafting and sewing- I keep adding to my never-ending to-do list, I will just have to find time to squeeze it in. Sewing and crafting is my "me" time and my therapy! I just love creating things and can't wait to have time to crank out some more projects! The past two days I've been working in my classroom getting it ready for kids. This year is super exciting for many reasons. We moved into a brand new (and stunningly beautiful) campus and I will be teaching 4th grade for the first time in 10 years of teaching! I've always been a 5th grade teacher. I haven't been self-contained since my first year, so it will be interesting! I'm ready for it!!

Friday, August 13, 2010

Over 1,000!

Just noticed that there's been over 1,000 clicks on my blog! That is exciting!! Granted, 992 of them are probably from yours truly, but oh well!! Funny that I'm excited about 1,000 and Char over at Crap I've Made just celebrated her MILLIONTH!! Baby steps, people. Baby steps! :)

I only wish more people would leave comments. You should totally leave a comment. Reading comments makes me happy. Don't you want to make Tracy happy?! :) I would say "everyone's doing it".. but they're not! Hahaha!

Mini-me version of the t-shirt pants!!

This is SERIOUSLY the bomb! Yes, I said it. I said, "the bomb". That's how I roll. I turned in my Cool Card ages ago! But for real, I know how much I LOVE my t-shirt turned yoga pants so why wouldn't Brooke love them just as well? I told her I was going to make something for her when she napped the other day and this is what I did! I followed the tutorial over at Lil Blue Boo. It is quite a bit different than the way I made the adult sized version and it's a little more involved, but it is totally worth it! For the child sized version, you cut from the sides of the shirt so you don't want to use a shirt that has a large graphic, because you would be cutting in to it. I actually used two shirts for this. Totally NOT because I messed up on the first one, NOPE, not at all! So... since I didn't mess up on the first one, I cut the large graphic (Milwaukee Brewers logo) from it and used it on the second shirt. I made solid colored pants and then appliqued the logo from the other shirt onto the pants. LOVE IT! You can often find plain t's at dollar stores or on clearance at Wal Mart or similar. These would be great for the pant part and then you can use your logo or picture or words from old t shirts to applique onto them And, by applique, I mean I straight stitched around the outer edge of the graphic! Another difference is the waist. For these you actually make a casing and insert elastic. This is great for littles and I may make one pair like this for me to see if I like it or not. But, I pretty much am in love with the wide t-shirt waist band on the others b/c well they remind me of my comfy maternity pants! Yes, I will wear maternity clothes until I die. Don't hate.


Just like I will end up with 237927 pairs of these pants.. so will my darling daughter!! You can also fiddle with the length on these and make them into shorts or full length pants.
So.. the boy may just get some as well!!

Wednesday, August 11, 2010

Sweet singed flower headband!

I've been dying to make some singed satin flowers, but I really don't have a lot of satin and what I have doesn't really coordinate. But, I went ahead and tried it anyway. To improvise, I used some wide satin ribbon and even threw in a piece of grosgrain. It worked out and I am in LOVE with the final product!! I see myself hitting up Joanns very soon for some very small yardage of various colors of satin!! This is just too cute and easy to not make a ton of them!! I used this tutorial as my inspiration, but I've also seen a similar one here .

Monday, August 9, 2010

Super Neat-o Happy Nappy Time nap! :)

Have you missed me?!? I have missed YOU!! We had a bit of a plumbing catastrophe.. ie. black water pouring down my wall in the laundry room (and flooding it- twice) from a kitchen sewage back-up. OH, how I love OLD cast iron pipes! BLECK! That meant one afternoon with a plumber instead of my sewing machine. Another day my mother in law came to visit and one day I spent making some re-usable snack bags and sandwich wraps. But.. my super duper awesome and exciting project is a NAP MAT! I am in love with this and hope to make many more for other people!! :)
It started out as this:

I made this one with just the mat cover and attached pillow case. I can easily modify it and add a blanket that is attached. This has a velcro closure at the bottom of the mat and the pillow case as well.
I hate raw edges, so I made sure to encase them all in this cover. I used a french seam for the length of the cover and for all of the other seams I folded over twice to enclose and then top stitched. :) Have I mentioned my love for the French seam?!
Here's a quickie on how to make one!

Sew fabric WRONG sides together.


I sewed using a larger seam allowance and then trimmed off the slevage afterwards (as seen here).


Flip the fabric so RIGHT sides are facing and sew, being sure your seam allowance is large enough to completely encase the seam allowance from the first step.


And VIOLA! Lookie there!! A gorgeous French Seam!!! *applause*! No little frayed bits!

After sewing the main body of the mat cover, I sewed the pillow case.
 I first sewed the short ends (where you insert the pillow).
 
LOVE this fabric!!

Then, I turned it RIGHT sides facing and sewed ONLY the TOP together. I left the bottom open because I was going to attach it to the top of the mat cover and it would be sewn shut at the same time as the mat cover.

In this picture, the seam on the right side is actually the top of
 the case and the bottom edge there is open (to insert pillow).

Now, here is where I had to think. Hard. I had to think hard because I had to figure out how to attach the pillow case to the top of the nap mat all in the same seam... this may seem easy peasy, but it hurt my little noggin!! I FINALLY *thought* I had it figured out so I went for it!

(Pretend that brown dot fabric is folded over one more time... mmkay?!).
You can see here how I inserted the case into the mat.


Even though I think pinning is for pansies, I went ahead and pinned it all together here.
Then I sewed it and turned it...

.. did a little bit of this....
and..


Hot dog, hot dog, hot diggity dog, it WORKED!!


I inserted the pillow and  mat and then folded it to see how much I had to hem at the bottom.
It turned out to be a few inches. So, I hemmed it with a generous seam allowance
and then I added a long strip of velcro.


Same thing on the pillow case (it is only pinned in the picture, but I did sew it down!) :)


I sewed a long length of ribbon on to the bottom of the mat so you can tie it up all pretty-like!


Isn't it just so pretty!?!


Now, I just need someone to tell me that I do NOT need some of this yummy fabric for myself!

Thursday, August 5, 2010

Twisty Towels for two!

I'm a huge fan of the Turbie Twist towel. I have had some of these for years! Like over a decade, I bet! Well... the little elastic thingy has come off of two of them, so I decided to make a new one! While I was at it, I thought I'd also make one for my Mini Me! This was a SUPER DUPER quick little project so I thought I'd make a little tutorial for anyone who is interested. You can easily make two of these in 30 minutes!

I used my old Turbie and cut around it, but if you don't haveo one you could easily just guesstimate. I will go back and measure length and height and update this- totally didn't think to do that. Doh!

The purple towel on the left is the original towel. For this project you will need some Terry cloth (or an old towel you can cut up), scissors, and elastic.

I folded the fabric over and laid the Turbie on top, that way one cut will make my two pieces.


I cut it out, leaving a little bit of excess fabric for a seam allowance.


I folded over the bottom edge and sewed a quick hem (this will be on the inside).
Do this for both pieces, but be sure to fold over the second piece the right way.. or....

you will have to use your seam ripper and fix it! Oops! ;)


After your seams on the bottom edge are sewn, place the two pieces, RIGHT sides together. You will need to cut a small strip of 1/4" elastic (or elastic cord) and pin it, with the loop pointing INSIDE the towel. I'm not a pinner, but I did pin the elastic. If you are a pinner, you would probably pin up the three sides of the towel now. Pinning is overrated (and takes time..). I'm impatient!


Sew your three sides, being sure to leave the bottom where you hemmed it OPEN. When you get to the elastic, sew over it, backstitch, then over it again (if you are neurotic like me, do it once more). You will be pulling on this loop to secure the towel, so it's better to have too many stitches than not enough!


Since my seams were wonky and uneven I trimmed. You don't have to do this, and honestly I didn't need to.


This is the front of the towel (or the back, depending on how you wear it). Not sure if you can tell, but it is uneven. This bothers me, so I went back and sewed my seam a little wider to correct this.


Aahhh! Better! :)


DONE!

On to the Mini Me towel! I had enough fabric left from my first cut to make hers.

I guesstimated the size and didn't think the length was quite long enough for it to be able to "twist" and be able to be secured w/ the elastic. So, I added a little to the "tail" part.


I followed the same steps as above and here is the finished miniature version!

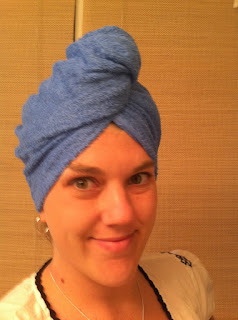
The Turbie Twist shows you to wear it with the elastic on the back of your head. I've always worn it backwards, I suppose, b/c I like it on top of my head. I will show you how to wear it either way.


My way. Put it on your head, tail to the back.


Wrap your hair in the towel and twist it upwards.


Secure it on top of your noggin in the elastic loop!


Viola! Done! (the "wrong" way!)

Here is the "other" way.


Tail to the front.


Twist.


Secure on the back of your noggin!

This sort of makes you want to charm snakes and blow on your flute, huh?


Here is Mini Me with her towel. She had JUST woken up and was way excited to see what I made her!


LOL!


She approves!!


Me and my BFF!! I LOVE her!!


I hope you enjoyed this! :)
Related Posts Plugin for WordPress, Blogger...