You can make these for around $10 each and that includes all supplies, fillers for the boxes, and decoration! Not too shabby for an impressive handmade gift. :)
Supplies needed:

2. Coordinating scrapbook papers
3. A sprig of faux flowers
4. Some little gems to add to the centers of the flowers
5. Scissors
6. Hot glue gun
7. Ribbon
8. An assortment of candy/treats and office/desk supplies (be sure they are small enough to fit in the compartments of the box you purchased).
I went to the Dollar Tree and grabbed a bunch of random crap for the boxes. I ended up with waaay too much and, FYI the Dollar Tree does not accept returns, even with a receipt. They will let you exchange things tough....
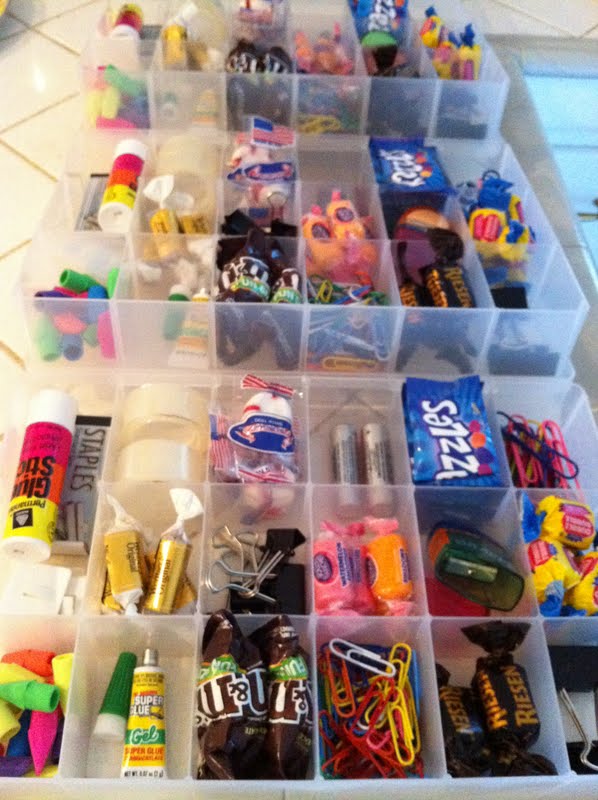
I had a glue stick, Krazy glue, erasers, a mini stapler w/ staples, binder clips, erasers (regular and cap) mini tape rolls, batteries, paperclips (2 sizes),a pencil sharpener w/ an eraser on one end, tootsie rolls, gum, M&M's, and some other odd candy.

I spent WAY too much time trying to pick out coordinating papers and letters. It was stupid, really. I had to make three gifts and these are the combinations I came up with.


(the letters are missing in this one, oops!)

Step 2: Place your paper on the top of the box and use scissors to cut around the curves so that it will fit nicely on top. Be sure to leave a little border on the top. I used a 2-3 different papers for each one, so I had to cut and line them up. Before you glue down your paper you want to cut a length of ribbon that will wrap around the entire box. This needs to be long enough to be able to tie into a bow when the box is closed. This is purely for decoration tough, since the box does fasten shut.
Step 3: Using a strip of hot glue, glue down your ribbon (be careful not to burn your fingers!) and tie it in a bow in the front. This will help hold it taught while it dries and you continue working on the project.
Step 4: Glue down the papers you have already cut for the top cover (you will glue them down on top of the ribbon). I used my hot glue gun b/c the E-6000 glue I had wasn't drying quick enough for my ADD.

Step 5: Get out your sprig of flowers and pull the flowers off of the stems. I also pulled out the cheapy plastic center so the petals separated from each other. Mine were different sizes, so I put a couple together to make the flower embellishments that I placed on top of the papers.
Step 6: Figure out how many flowers you want on the front and how you want them clustered. You will also need to figure out where you will be placing the teacher name. You can go ahead and put the letter stickers down now to spell out the name.
Step 7: Using your glue gun, put a dot of glue where you want a flower and place two petals on top (or use whatever flower you have). My glue squished through the center when I pressed them down and enough usually popped through the top to put the little gem on. You may have to put another little dot of glue on top if this doesn't happen tough.

Step 8: Admire your creation!


I guarantee that the recipient of these little treasures will love them!


Such a cutie!
ReplyDeleteThese are so cute! I know anybody would live one of these, especially teachers! What a great first day of school gift! Thanks for sharing.
ReplyDelete