Showing posts with label tutorial. Show all posts

Friday, August 12, 2011

Terrific Teacher Gift tutorial!

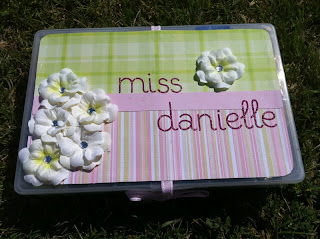
This past year I made the cutest little gifts for my kids' daycare teachers during teacher appreciation week. I meant to share this tutorial waay back then, but didn't have the time! As with so many things, better late than never! I just love these and you can customize them however you'd like!

You can make these for around $10 each and that includes all supplies, fillers for the boxes, and decoration! Not too shabby for an impressive handmade gift. :)

Supplies needed:
1. An organizer box like that ^^. This one is $3.99 when not on sale, but I ALWAYS either get things on sale or with a coupon. I will not be caught dead paying full price at Joann's! The boxes I used were even cheaper right around $2! These can be found near the beads/ jewelry making items.  http://www.joann.com/joann/catalog/productdetail.jsp?CATID=cat2119&PRODID=prd53261

2. Coordinating scrapbook papers
3. A sprig of faux flowers
4. Some  little gems to add to the centers of the flowers
5. Scissors
6. Hot glue gun
7. Ribbon
8. An assortment of candy/treats and office/desk supplies (be sure they are small enough to fit in the compartments of the box you purchased).

I went to the Dollar Tree and grabbed a bunch of random crap for the boxes. I ended up with waaay too much and, FYI the Dollar Tree does not accept returns, even with a receipt. They will let you exchange things tough....

I had a glue stick, Krazy glue, erasers, a mini stapler w/ staples, binder clips, erasers (regular and cap) mini tape rolls, batteries, paperclips (2 sizes),a pencil sharpener w/ an eraser on one end, tootsie rolls, gum, M&M's, and some other odd candy. 


 I spent WAY too much time trying to pick out coordinating papers and letters. It was stupid, really. I had to make three gifts and these are the combinations I came up with.


(the letters are missing in this one, oops!)

Step 2: Place your paper on the top of the box and use scissors to cut around the curves so that it will fit nicely on top. Be sure to leave a little border on the top. I used a 2-3 different papers for each one, so I had to cut and line them up. Before you glue down your paper you want to cut a length of ribbon that will wrap around the entire box. This needs to be long enough to be able to tie into a bow when the box is closed. This is purely for decoration tough, since the box does fasten shut.

Step 3: Using a strip of hot glue, glue down your ribbon (be careful not to burn your fingers!) and tie it in a bow in the front. This will help hold it taught while it dries and you continue working on the project. 

Step 4: Glue down the papers you have already cut for the top cover (you will glue them down on top of the ribbon). I used my hot glue gun b/c the E-6000 glue I had wasn't drying quick enough for my ADD.


Step 5: Get out your sprig of flowers and pull the flowers off of the stems. I also pulled out the  cheapy plastic center so the petals separated from each other. Mine were different sizes, so I  put a couple together to make the flower embellishments that I placed on top of the papers.

Step 6: Figure out how many flowers you want on the front and how you want them clustered. You will also need to figure out where you will be placing the teacher name. You can go ahead and put the letter stickers down now to spell out the name.

Step 7: Using your glue gun, put a dot of glue where you want a flower and place two petals on top (or use whatever flower you have). My glue squished through the center when I pressed them down and enough usually popped through the top to put the little gem on. You may have to put another little dot of glue on top if this doesn't happen tough.

Step 8: Admire your creation! 


I guarantee that the recipient of these little treasures will love them!


Wednesday, August 10, 2011

Reusable sandwich/ snack bag tutorial

I've fiddle diddled with making reusable snack bags. I've made them in a few different sizes and different ways. Initially they were just unlined cloth, but I wanted something that was easier to clean and that could hold some "wetter" foods like fruit without making the bag gross. I got some ideas from other tutorials out there and came up with this.

Since I was going to cut and sew up several of these and since I don't like measuring and cutting fabric.. I grabbed a piece of foam core board and made a template. My final size on these bags is around 6 1/2" x 7", so my template is 13 1/2" x 7 1/2".

Another short cut/ cheat method is to use fat quarters. I tend to grab several coordinating packs when they are 50% off. I've had these since last summer. I am able to get three bags out of each fat quarter with enough leftover to actually make a small one that would be perfect for a little treat like m&m's or skittles. A little built-in portion control! I stacked 4 fat quarters, placed my template on top and cut through all layers. Made quick work of cutting and resulted in several cuts of fabric all at once! I folded the nylon over and cut it in the same fashion.

Then I went over to my  sewing machine, put one piece of fabric with one piece of nylon, right sides together, and using 1/4" seam allowance, sewed the short ends, . (hard to see here in the pic, but each short end is sewn shut and the long ends are open).

I took them over to the ironing board and flipped them right sides out.

The ends sort of puff up, so I pressed the seams down on the fabric side (NOT the nylon side!). 

Even though I don't believe in ironing many things, it's much easier to finish these when you have a nice flat piece to work with.

A nice pile of pressed bags, ready to be finished. So, back to the machine!

Cut your velcro 1/2"ish shorter than the width of your bag. Okay, so I used the sticky back velcro. I do suppose sew-on is the "right" way to go, but I'm such a rebel... and I have a whole box of this stuff. I believe you don't have to sew this down, but I want these to hold up and last, so I do. You actually place the velcro on the nylon side, so let's go to the next picture. (It was easier to show you the width against the dark fabric than it would have been on the white nylon side).

Okay, so here is where I start with the different options. You choose what you like best and do it. 
** Keep in mind that by sewing on top of the sticky  back velcro, you can almost bet that you will have some issues eventually and may even bend or break a needle (since the gunk from the sticky velcro can build up on the needle). This won't be a problem for one or two bags, but if you are planning on doing several you really may want to use the sew on velcro or not do Option #1.

Option #1. Sew a line at the top of your velcro strip.

Then sew along the bottom edge of the velcro. Go down and do the same for the other piece that is at the opposite end.

Fold the sack in half, right sides together, lining up the top edges. 

Using a 1/4" seam allowance, sew down the sides from the velcro to the bottom.

Clip the corners carefully.

Flip the bag, right sides out.

Encase the raw edges inside by sewing down each side again using a slightly bigger than 1/4" seam allowance. 

 PS- this is how I know about the possibility of bending a needle... But, I'm such a rebel that it doesn't stop me from continuing on with the sticky back tape! Ha!


Here is the inside. It is completely lined with nylon and there are no raw edges.

Option #2. Use a wide zig-zag down the middle of your velcro strip. I figured this would cause less needle issues and also may look cool. 

I like it. But, it seemed like it needed more, so I ended up stitching a straight line at the top edge of the bag and right under the velcro. So, more stitching in the end, but less stitching on the actual velcro. Confused?....

Since the nylon is slippery, you may end up with some uneven edges like this. No problem, just trim them off and square it up. 

Like so.


Because I'm me, I forgot to change my machine over to the widest zig zag so this one came out shorter, but looked good as well. So, there's another option. 

This made me happy. I was eating a package (yes, the WHOLE package, don't judge- I'm due in 2 weeks) of Dark Chocolate M&M's and thought they were all gone. But then I noticed some colorful happiness next to my machine and wha?!?! 4 little guys waiting for me! Yay!


Friday, July 29, 2011

MORE Melted Crayon Craziness!


Well, we did it again! I knew I wanted to make more of these canvases and I wanted to try a couple of other techniques to see what else would work! Brooke and I spent a little time yesterday sorting out the colors from 4 boxes of crayons. FYI- for my 11"x14" canvas 40 crayons fit perfectly. So, I chose 10 different colors and used 4 of each one. (In case you missed my first post on how to do this, you can find it here).

This shows you how I laid them out. I would put one down of each color in 4 different areas, then put the next color down beside it..

and so on, until I had 4 like groups of 10 different crayons.

As I said in my original post, I'm in Texas and hell has nothing on the heat we are experiencing. SURELY I could use the sun to melt these puppies. 

My other idea was to put them in the car to melt. Again, SO stinking hot, surely this would work.

However, we have SO many trees that we do not get steady sun in any one area of our yard (front or back) for more than about an hour or so. I had to move this canvas down after about an hour, but no melting had occurred yet.

This was the car canvas, and although it looked like it was starting to sweat/melt, again no drips (after about an hour).

Okay, so no steady sun in the yard or car (I wasn't going to keep moving the canvas from place to place and the car from driveway to street, and all around) = a no go for melting the crayons. So, I put them on the counter and came back to them this afternoon. I was talking to my mom on the phone and she suggested trying them in the oven... brilliant! So, I did. And it worked. Beautifully!

Here was my first set up. Since I'm "with child" those beer mugs sure aren't getting any use (but boy howdy, I would KILL for an ice cold brew!!). I put some foil down on a cookie sheet, propped my canvas up on the mugs, and placed the whole set-up in the oven.

I set mine to 250 (wish I knew how to do the little degree symbol thingy!).
 

I took a peek after about 1 1/2 minutes and WHA?!?! Drippy?! Yay!

 But, the angle they were at was making the tops of the crayons melt over the wrappers and I thought that looked messy. So.. my anal retentive self took them out of the oven (while Brooke asked, "What's wrong, Mama? Why are you taking them out already?"). I told her I was fixing them and so I did.

Like so. I put one in front of the other to make the angle more steep.

Then I put them back in to get their melt on.


Definitely put down some foil b/c they will likely melt off of the canvas a bit.

This is the finished product for Brooke's canvas. DONE in 5 minutes!! :)

Here is Benjamin's (also after just 5 minutes!)!

These have a different look than the first one I did, since the colors dripped straight down and didn't bleed or blend in with the colors beside them.

Love these colors too!

I love how they turned out and how I did the different color groups. 
Related Posts Plugin for WordPress, Blogger...