I know I am not alone in my Pinterest OBSESSION.... Recently I saw a Pin that was linked to a seller on Etsy for custom Crayon art. It looked to be crayons that were affixed to a canvas and melted down the canvas. I LOVED the look of the drippy, melty, colorful wax.. but my cheap ass didn't love the price tag. The artsy fartsy craftsy part of me just knew I could make this on my own.. for a fraction of the cost. So I did. And, lucky you, I will show and tell you how I figured it out!
Here is the one from
Etsy. Awesome, isn't it?! This 16"x20" framed canvas sold for $65 or $75!!
Now, before mommy is allowed to do an art project (when the kids are awake), I have to find something fun for them to do! So... we tried sandpaper art. I *shocker* also saw this idea on Pinterest, but I believe they were making t-shirts. To be honest, I didn't click the link, I just re-pinned it and came up with this. On a clipboard, I put down a piece of sandpaper, covered it with a piece of drawing paper, and gave them some twistable crayons. They had a great time and I got busy on my own crayon project!
Our supplies.
They got busy right away. I love my righty and my lefty- it works well when they are sharing space on the Learning Tower!
But, apparently Benjamin decided he needed a little more elbow room!
You can sort of see the texture here. Not great, but it worked, I suppose.
Next time I'll get a tougher grit sandpaper. They loved it though and that's what matters!
Onto the crayon project! This was SUCH a cheap project!! Right now Kroger has Crayola 24 packs of crayons on sale for .25 each (up to 4)!! Just typing that makes me want to go buy more!! Wal Mart will match it as well, so go get you some Crayola's!!
Supplies:
2 boxes of Crayola 24ct. crayons (2 @ .25/ea = .50)
1 11"x14" canvas (3pk @ 5.14, so 1 = $1.71) (* I had an old 3 pack of canvases from years ago- don't know how much they would be now, but the price tag on them was $5.14!)
hot glue gun & glue
blow dryer
newspaper or other covering to cover your work area a.k.a. "the splatter zone"
Total cost = less than $2.50!!
This is the back of the canvas I used. It's not the kind that is stretched over a frame.
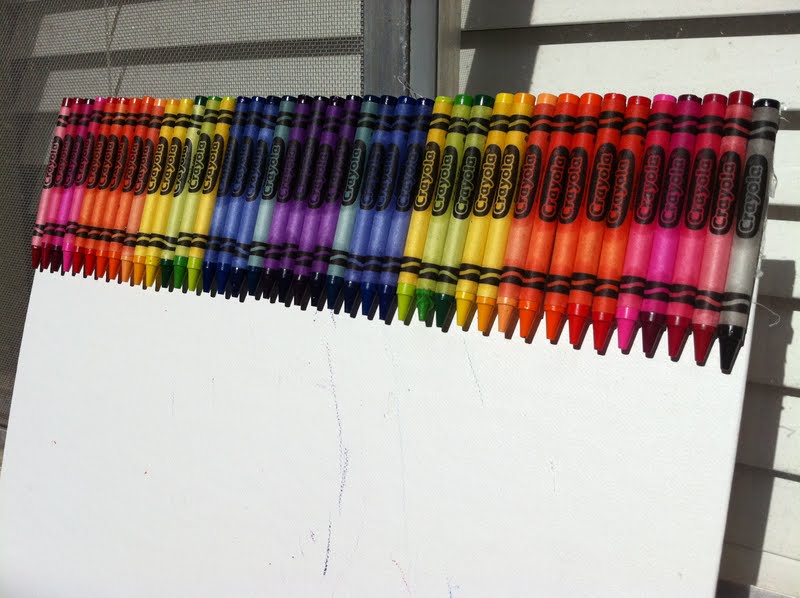
So, of course you can use any color combination you wish, but for an 11"x14" canvas, two packs fit perfectly!! I did the rainbow, then the reverse rainbow. I left out the two white, two browns, and one black. There was space for one crayon at the end so I added a black.
Step 1: Lay out your crayons in the order you want them to be on your canvas.
Step 2: Move them down towards the bottom of your canvas so you can begin gluing at the top. Using your hot glue gun, make two lines of hot glue, approximately 2"-3" long (depending on how quickly you work). Place the crayons individually on the glue, working quickly before it dries. Be sure to line them up straight and use the top of the canvas as a guide. I thought it was important for them all to look cohesive, so I made sure "Crayola" was facing out on all of them. It would also be neat if you did it and showed the other side, with the names of each color showing instead.
My line got wonky and I had to peel a few crayons off. In the process Mr. Green broke his tip. (Aaaaahhhhh!!!). My immediate thought was to glue it back.. yeah, with hot glue. Any guesses how that worked out?....
Well poo poo on you for being a Negative Nancy and thinking it wouldn't work! Thinking that it would just melt and not stick... HA! It did melt and it didn't work...at first, but I overcame and conquered attaching the tip! Did it really need to be put back on? Nope, but the one broken tip just didn't sit well with me!
Step 3: Go outside and take a picture of your beautiful glued down crayons! It looked SO cool!!
This picture shows you the width of the canvas (and my little fella!).
So, I'm in Texas. It's summer. It's friggin HOT. You could cook a steak on your dashboard. Naturally, my first thought was to set it in the sun and let the sun do its work. This says it was 99, but that wasn't current, it was more than 30 minutes before I saved this picture. Yesterday it reached 100 after 5pm, so I'm going with that.
So, I found a sunny spot in the backyard, up against the house.
But, as you can see the sun was close to going behind the trees.
The kids played in the sand table.
I watered our pathetic, it's too hot for us to be alive, hanging baskets.
We had some popsicles..
Ben dropped his green one, so he took mine...
At 15 minutes you can sort of see that the wax began melting in the wrappers and becoming translucent. But, no drippy-drippy. :(
I finished my popsicle. Here's the joke on my stick.
At 30 minutes: Yep, they are hot, but still NO drippy! I had to move the canvas up to the window sill because the sun had moved and it was beginning to get shady.
See?
Brooke finished her popsicle.
And Ben did too.
Phoebe said hello.
And then we went inside and I hatched Plan B. This is where it gets serious and fun!
Step 4: Get out your hair dryer.
Since it WILL splatter... protect your work area with newspaper or something similar. That is pink crayon. Oops.
Our little art project drop cloth is a plastic table cloth from the Dollar Tree. I had to place things on both sides to hold it up (would have been smarter to just tape it up, but oh well. I also had to put something in front of the canvas so it wouldn't slide down.
Step 5: prop up your canvas at an angle so the wax will drip onto the canvas and not onto the surface below.
Step 6: Use your dryer on the "hot" setting. I started out with high and once the wax started melting I went back down to "low". The high will give more of a splattered look along with the dripping. I wanted the drips for this one, not splatter. I'll probably do this again and play more with the different things you can do with how the wax drips.
Here is a short video of the process. (sorry it is sideways...)
Step 7: Keep going along your canvas and go back and forth as you see fit.
VIOLA!! Done!! That was seriously FUN!
Step 8: Take your finished masterpiece outside to admire it, photograph it, and upload the pics to FB to share with your friends!! SO awesome!
Since I also have a *slight* Instagram obsession... I had to Instagram the pic! :)
Now I just have to figure out how I want to display this. It would be cool to mount it to a painted board, methinks!... This is great for a kid's room or a play room, or an art room, craft room... etc!
Have FUN and please send me pics if you make one! I'd love to see what you come up with! If you blog about this, please link back here!
I have added this project to many
link parties, and
here, and
here! If you want to be inspired, check them out!
**EDIT** I have since figured out another way to do this with a little bit of a different drippy effect. You can find that post
here!


