Showing posts with label kids. Show all posts

Friday, July 29, 2011

Happy handprints (and footprints)!

I have to first say that I LOVE that my children LOVE doing arts and crafts as much as I do!! Thank goodness, because my heart would be sad if they didn't! Today, for example, we colored a little, played with the window markers (great things, until your 17month old decides to eat them...), finished up the melted crayon canvas art in the oven, then did a bunch of handprint art, and just as soon as we finished Brooke asked if she could color! Whew!

Both Brooke and Benjamin love hand print and foot print art, and I do as well, so today I wanted to try MY hand (har, har) at replicating some of the super cute ideas I have seen online lately!

First up: BUTTERFLY!

Okay so to make the butterfly you need a footprint from each foot. I thought I'd have her stand on the counter and lift her foot while I painted it, then have her hold on to the cabinet (or my head...) and I'd put her foot down on the paper... Would have been easier on the floor, but since I'm popping a baby out in less than a month I'm not *quite* as flexible at the moment! Brooke loved standing on the counter anyway! Okay, so it worked, but was awkward and one of her prints was wonky, so I went to plan "B".


I had her sit on the counter, put the paper on a clipboard, propped it up against my belly,  and pulled her foot towards it, pressed and then pulled it off. MUCH. better. idea.

Luckily Benjamin was perfectly content playing in the kitchen and laying on the floor (???).... while I worked with Brooke.

Up next: LOBSTER!!

The lobster requires one footprint and one of each hand. I did Brooke's first and then did Benjamin's. He was so super cooperative (yay!).

Love his cute, squishy foot! 


I'm telling you, I have the BEST helper!!


So, this is NOT how you need it to look. the footprint here should be pointed the other way (toes down). Oops! I did Brooke's correctly and did hers first, but um... brain fart on this one?
I didn't throw it away. Nope. I cut them out and glued them onto a new piece of paper, the right way! :)

Final one: PEACOCK!
For the peacock, you need a LOT of handprints, all around the middle (do the handprints first). Then, the body of the bird is supposed to be ONE footprint, toes pointed down. In doing these things with footprints, I quickly realized that my my little lady has a very high arch! Our first attempt on the "body" was horrible. There was too much wet paint and her foot slipped, so it looked crappy. I tried to fix it by doing a print of her other foot next to it (there's fat people, so why not fat peacocks?). See that white shape in the middle? That is b/c of her arch.. so it still looked lame. I set it aside to dry and my final attempt at fixing it was to use one white footprint for the body.

Here are the final masterpieces! I just LOVE them!! 

Lovely lobsters!

Beautiful Butterflies!

And um...... Pathetic peacock?!... 
(I think he is cute!)

MORE Melted Crayon Craziness!


Well, we did it again! I knew I wanted to make more of these canvases and I wanted to try a couple of other techniques to see what else would work! Brooke and I spent a little time yesterday sorting out the colors from 4 boxes of crayons. FYI- for my 11"x14" canvas 40 crayons fit perfectly. So, I chose 10 different colors and used 4 of each one. (In case you missed my first post on how to do this, you can find it here).

This shows you how I laid them out. I would put one down of each color in 4 different areas, then put the next color down beside it..

and so on, until I had 4 like groups of 10 different crayons.

As I said in my original post, I'm in Texas and hell has nothing on the heat we are experiencing. SURELY I could use the sun to melt these puppies. 

My other idea was to put them in the car to melt. Again, SO stinking hot, surely this would work.

However, we have SO many trees that we do not get steady sun in any one area of our yard (front or back) for more than about an hour or so. I had to move this canvas down after about an hour, but no melting had occurred yet.

This was the car canvas, and although it looked like it was starting to sweat/melt, again no drips (after about an hour).

Okay, so no steady sun in the yard or car (I wasn't going to keep moving the canvas from place to place and the car from driveway to street, and all around) = a no go for melting the crayons. So, I put them on the counter and came back to them this afternoon. I was talking to my mom on the phone and she suggested trying them in the oven... brilliant! So, I did. And it worked. Beautifully!

Here was my first set up. Since I'm "with child" those beer mugs sure aren't getting any use (but boy howdy, I would KILL for an ice cold brew!!). I put some foil down on a cookie sheet, propped my canvas up on the mugs, and placed the whole set-up in the oven.

I set mine to 250 (wish I knew how to do the little degree symbol thingy!).
 

I took a peek after about 1 1/2 minutes and WHA?!?! Drippy?! Yay!

 But, the angle they were at was making the tops of the crayons melt over the wrappers and I thought that looked messy. So.. my anal retentive self took them out of the oven (while Brooke asked, "What's wrong, Mama? Why are you taking them out already?"). I told her I was fixing them and so I did.

Like so. I put one in front of the other to make the angle more steep.

Then I put them back in to get their melt on.


Definitely put down some foil b/c they will likely melt off of the canvas a bit.

This is the finished product for Brooke's canvas. DONE in 5 minutes!! :)

Here is Benjamin's (also after just 5 minutes!)!

These have a different look than the first one I did, since the colors dripped straight down and didn't bleed or blend in with the colors beside them.

Love these colors too!

I love how they turned out and how I did the different color groups. 

Saturday, July 23, 2011

Homemade Puffy Paint fun!!

I'd like to formally thank Pinterest for helping me keep me busy, keep my kids happy, and for adding to my never-ending "to do" list! Last week I checked another Pinterest To Do off of my list: HOMEMADE PUFFY PAINT!! How rad does that sound?! I got the idea from the One Crafty Mumma blog. It is very easy, slightly messy, and boat loads of fun! Her recipe calls for self-rising flour, but if you are like me (and most people, I think) you don't have that.  You have All Purpose flour.  So... I will post the ingredients I used and it worked beautifully.

Supplies needed: 
Flour
Salt
Baking powder
Food coloring
Water
Small bowls
Q-tips (or paintbrushes)
Sheets of thin carboard, cardstock, or thick art paper (the thicker, the better for this project)
Newspaper or something to cover your work area (I use a plastic table cloth from the Dollar Tree)

For each bowl you will add:
1 Tbsp flour
1 Tbsp salt
1 tsp baking powder
a few drops of food coloring (depending on how bright or dark as you want it)
4 tsp water (approximately- add until you have a spreadable paste)

To Do:
Mix each color. Pass out the cardstock (or whatever you are using) and Q-tips. Get to work unleashing your creativity! When done, pop your masterpiece into the microwave for 20-30 seconds (start at 20 and see how dry it is). You want it to dry the paint out and puff it up.. but don't want it to burn.

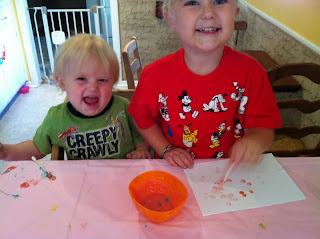
Here is our journey through the puffy paint experience. I included the first few pictures just so you could see what I'm working with when it comes to photographing a 17 month old boy and a 3 year old girl (who loves having her picture taken!)... Good stuff, I tell ya!


Okay, here is my Pampered Chef plug: If you don't have one of these mini-whisk things, you NEED one! Talk about a versatile little tool! It worked like a charm for mixing up this stuff, but it also is amazing for whisking up gravy (no lumps!), getting all those dry clumps out of hot chocolate (I think I just perspired writing that as it is 100+ outside.. again..), and even for scrambling eggs!

The blue bowl is already mixed, green is in process, and yellow is up next.

Here are my little artists hard at work!


Here they are, before puffing.

And again with the Benjamin expressions.

What the frig?


Cook, cook, cook, puff, puff, puff.

Well hot dog! Lookie there! Can you see the puffy greatness?

Before & After

I got in on the action! I couldn't help myself! :)

It's pufftastic!


Minimal mess and destruction!

Brooke gave her seal of approval and asked if we could "do this art project togain (again) soon!" How can I say no to that adorable face?!
Related Posts Plugin for WordPress, Blogger...