Have you ever heard of a Busy Bag? How about a Busy Bag swap?! I hadn't heard of either, but boy are they cool! In my blog hopping, I saw that Brenda over at the Unsolicited Advice blog was hosting a Busy Bag swap for kiddos of all ages. The first one was for Young Toddlers (ages 1-2) and since I have one of those, I filled out the form to see if I could participate! This is a good one for me to start with, since I've never done this and I'd like to see how it goes. I wanted to also do the one for Brooke's age, but dang-it-all I missed the application date!! (BOOO!)
You can check it out to see how it works if you are interested. If nothing else, she's linked a ton of different ideas and activities that you can check out and make for your little ones! You don't need to be part of a swap to make a Busy Bag activities! :) I will link up some ideas at the end of this post.
The activity I had to make was a mini felt board. I am supposed to make 15 of these and then send them to my swap coordinator with a check to cover the cost of a large flat rate box. She will receive the activities from the other 14 people, put one of each of the 15 bags of activities into the boxes and ship them to us! So, I send out 15 of one activity and get back 15 different activities (one of which is the one I made). Did that make sense at all?!
So I looked at some links I had found on mini felt boards and decided I wanted to come up with my own. I believe the one she suggested just had you glue felt onto the front and back side of a half sheet of card stock. Knowing my child.. I just didn't think that it would hold up very well. I thought that foam core board would be much more sturdy, so I put the hamster in the wheel in my head and let it start running! Another idea I had seen showed using just one side of cardboard, or foam core, or even wood and then taping it down on the other side using duct tape and mitered corners. But, messing with cutting tape and all of that, I wanted to come up with a way to sew it. For me, sewing would be easier than taping. Silly! I came up with a GREAT idea.. in my head... and set out to see if it would actually work!
Here is my little photo tutorial! This is how I made 15, but of course you can make one at a time and make it any size you wish! These would even be cool as little party favors, or something fun to take on a play date.
I got out my piece of foam core and measured the length and width (29' x 20").
Since I needed 15, I divided the length (29") by 5 and came up with roughly 6.7" and the width (20") by 3 and came up with 5.8". I marked these and used my ruler to divide the board up into 15 equal-ish rectangles.

You know what is AWESOME?! Taking the time to figure out the dimensions and divide up the board only to turn it over and see that it had grid lines (would have made it a little easier, but oh well!).

Once I had my lines drawn I had to cut them into pieces. I knew that scissors would be a PITA so I got out the big gun.. the Xacto knife! I put my self-healing mat underneath and using my ruler was able to cut some pretty straight lines.. and it went really quickly!

Ah-ha! I love that it worked w/ one cut! yay!

One thing that probably helped speed this up was my ruler. I love this thing! It has a raised lip on one edge, so it "hangs on" and makes quick work of cutting things w/out having to worry as much if you are holding your ruler straight or if it will slide while you are cutting, etc.

Viola! 15 squares cut!

I haven't been to the store yet to get felt, so I used what I had on hand. I will have to get to the store to get some more colors though. They say a dark background is good for these, so I used the dark brown that I had leftover from Brooke's cupcake costume. I laid a piece onto the felt and cut around it, leaving about 1/2" edge on all sides (I eyeballed it.. too lazy to measure).

My grand plan was to put the board inside of two pieces and sew up the sides. Since it is felt, you don't need to worry about raw edges or fraying. Yay!

But, I hadn't yet thought of how I would do this... I didn't want to have to use spray adhesive to make the board stick, didn't want to use glue, couldn't really pin it....

So I decided to just sew up three edges, leave one side open, slide the board it, and then sew shut!

I just used the width of my presser foot as I sewed along all edges. It was PERFECT... just like I had planned!! Hoo-freaking-ray!!

When you sew that last edge down, this may happen since you have the bulk of the board in there now, but if it does, just trim it up. No biggie. I only had to do this on a couple of them.

So, so happy with how this turned out!

Since my prototype worked, I went back and just cut the squares that matched up with each piece and stacked them.

Then I sewed them all together! Easy peasy! I was able to make 5 of these from start (the blank white board), to finish in 35 minutes! Not too shabby! Yes, I still have 10 more to make but I ran out of the dark felt. My foam core is already cut for all of them, I just need to cut the felt and sew them up.

Crappola! I forgot to take a picture of the "house". I cut 3"x3" squares of felt to use for the "house".
For the roof of the house, I cut 3"x3" squares of another color and then cut it on the diagonal to get triangles (a perfect roof!).


I had cut some strips that were 1"x4"rectangles for the tree trunks, but I needed the green part of the tree. Going with the geometric theme, I wanted to make a circle. I found that a small ribbon spool was the perfect size.

I traced the circle onto the felt using my disappearing ink pen.

Then I stacked them so I could cut once and have four circles.

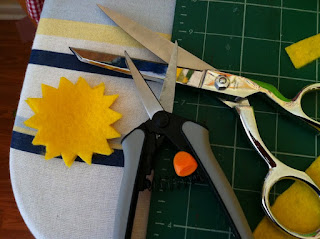
For the sun I used a smaller ribbon spool and drew rays around it.

I cut two of them out at the same time. I had started out using the big scissors, but ended up using my snips instead and that was much easier!
This is the simple little scene I came up with for the swap. I thought it was good because each shape was a different color and they were all of the basic shapes. :)

I finished the rest, assembly-line style!

I think the red roof was my favorite!

All packed up and ready to go! I can't wait to see what all I will get back in the swap! Err.. I mean I can't wait to see what Benjamin gets back in the swap.. since it is, afterall, for him! :)


great idea!!! This would be something really fun for the boys to have at the hospital when baby sister arrives! Too bad I didn't get in on the swap too!!! I guess it will just be another thing to add to the to-do list.
ReplyDeleteThis is a great idea! I made a larger felt board for my little guy about a year ago, but I think a mini one would be great to have. Thanks for the tip!
ReplyDeleteThank you for posting this. I just got an e-mail that asked me to make these as a fill in for one of the swaps on the same site. I love the foam board idea!
ReplyDeleteLove this!! I like it when someone gets creative and deviates... LOVE IT! I now have a blog post to link to for the mini felt boards. (That is, if you don't mind.) :) Great idea!
ReplyDeleteThanks so much for the compliments! I was thrilled with how they turned out! I'd be honored if you linked my blog post! :)
ReplyDeleteThese are very cute. Thanks for sharing. It was a great idea to sew the felt around the board :)
ReplyDeleteRachel
Love this post and your blog! I'm your newest follower- I'd love if you'd stop by and follow, too!
ReplyDeleteI am having my first linky party on Thursday and would love for you to come link your awesome craft! It's a party only for kids and teens crafts, so this is perfect to share on Thursday for our first "Crafts for Under Twenty-Something" linky party!
Thanks for sharing!
bearrabbitbear.blogspot.com
Oh, what a very cute idea! I love how simple, yet fun and darling they turned out. I also think the busy bag swap sounds like so much fun. I can't wait to look into it. How exciting to get a box in the mail full of fun educational items.
ReplyDeleteI look forward to reading more of your blogs. Come stop by if you get a chance.
Shauna
myshaenoel.blogspot.com
Wow! Your felt board is super cute and your tutorial is very thorough. Well done! I am a new follower and would love for you to link up at my Savvy HomeMade blog party at http://www.homesavvyatoz.com/2011/08/14/blog-party-3/
ReplyDeleteI look forward to blogging with you!
I love the idea of a swap. You will have to share what you got back. Great felt board! I am a new follower from the Show and Share Saturday Link Up. Vicky @ www.messforless.net
ReplyDeleteThis is a great idea to take when we travel and need something to entertain our little one. :)
ReplyDeleteI'd love for you to join my linky party:
http://tutusandteaparties.blogspot.com/2011/09/toddler-tuesdays-guest-post-from.html
This is a really great idea! I hope you got great activities in the swap.
ReplyDelete