It took me a few days to complete, mostly because when I started it I was also doing some naptime sleep training with the little fella so there were frequent interruptions! Oh that and the fact that I couldn't get my dang machine to shirr!! I seriously just sat there staring at the sleeves and my scrap piece that was a mess of shirring gone WRONG!! I finally figured it out (and have since made the adorable bandana dress that required a lot of shirring!). The dress is a tiered dress and takes a LOT of fabric, but well worth it! I made it in a size 4t and it ended up being really big. She is re-working the pattern and sizing it down a bit and I'm taking it in a little so that Brooke can wear it now, since she loves it as much as I do!
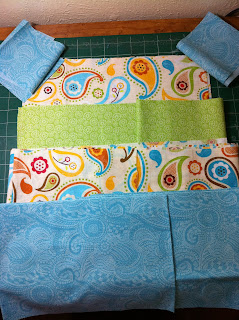
Here is the fabric combination I chose.. and love!
One awesome thing I learned while doing this was a different way to ruffle! Instead of doing long basting stitches, and pulling the strings, you can do a very wide zig zag and sew over a piece of contrasting thread- that you will use to pull and gather the ruffles. It is way quicker and easier!
See the brown thread there?
It's smart to use the contrasting thread so you can easily tell which string needs to be pulled!
LOTS of gathering.. lots of material! Lots and lots!
I also learned that I am not good at zig-zagging edges to prevent fraying. I DO have a serger, I just don't feel like I know how to use it properly! I'm not sure I've used it since last summer actually! I need to just get it out, read up on it (again), watch some video tutorials and do it. Much easier than this zig-zag business. I also never know how far over to put my material to get it to zig and zag correctly.
Using a serger is also a much quicker method of finishing raw edges.. in case you were wondering.
Proof that I mastered the shirring!!! Booyah! Take that Brother sewing machine!
I own you (now- you had me for a while, but I'm back so recognize.).
And my scrap pieces that I used while trying to figure this out!
Each row of stitches made me more and more frustrated!
This armhole piece is the only piece you had to print out.
Since I had finally messed with my machine, by tightening a screw on the bobbin casing, to get it to shirr, I didn't want to mess it up and have to be frustrated with getting it back to "normal" sewing mode. Naturally, I plan on doing a lot more shirring, so I decided to order a new casing! That way I'll have one for shirring, all set and ready to go, and one for regular sewing! I've had to wait for it to arrive in the mail, so I had to borrow my friend's really basic machine so that I could finish the dress and work on other projects. It has worked out well, but boy do I miss my machine!
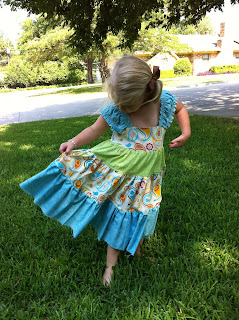
Here is the final dress! Love!
You can see it's too big at the shoulders here.
And too wide as well.
But, it's freaking adorable!
And best of all.... SHE LOVES IT!
After I finished this and submitted my pictures and revisions, she offered me the opportunity to test ANOTHER new pattern she's working on! Well heck yes!! This time it was for cargo shorts for boys and little tie shorts for a girl! I was so excited to have something to make for Benjamin! I made them today and they are SOOOO very cute!! I love them and will be making many more pairs I am sure! Brooke already wants a matching pair and that will be my project during naptime tomorrow! They were much more simple and quick to make than the dress- I was able to complete the pair in one day!
I had fun piecing the pattern pieces together.. it's like a puzzle! It also makes cutting out material much quicker! I was able to sit at my sewing table and cut out the pieces rather than have to haul my big preggo butt down to the floor!
These have a flat front (adorable!!), pockets (real ones!), and a faux fly (too cute!).
The elastic is in the back and the fit on these was great!
I'm so excited that I was able to make him a 4th of July outfit!!
I'm not showing off his belly here, but rather how the shorts fit!
And the back (love his little bowed legs!).
He loved the shorts too. No, really, he did.
Check out Little Lizard King's shop on Etsy.
Here is a link to her blog.
If you are on Facebook, you can like her page here.


Super cute dress! You've inspired me to finally buy a little lizard king pattern. Mostly I've just looked and drooled over the cuteness but I think today is the day for buying!
ReplyDelete